First of all, I’d like to apologize for prolonged silence. Research is what it is and doesn’t leave me much time to write…
A lot of my readers are what one might call “advanced homebrewers” who are not afraid of experimentation and know their way around the mashtun and yeast cultures. Some are also fellow yeast ranchers and know the pains of proper yeast ranch maintenance. My recent move forced me to disassemble and reassemble my lab so I thought I’d make a post on how to set up a home yeast lab or at least the way I went about it. The fact that it was all in pieces gave me a chance to rethink a few things and change/add/remove certain aspects and a couple people inquired about setting up a home lab so here is how I did it.
I’d like to point out that this is how I set it up and how I want it to be based on my experience working with bacterial, insect and mammalian cultures for a few years in a research laboratory setting. There is no one way that a lab, especially a home-set one, should be so this is by no means dogmatic. Feedback and suggestions are welcome, as always. Also I’m not trying to promote this or that store. I’m simply telling you where I got my equipment.
All right, let’s get started. I didn’t know how to best organize this and in the end decided to go from the basic and most necessary towards luxurious and fancy while describing how I use them and where I got them. There will be no in-depth technique discussion in this article. Otherwise it’ll be 30 pages long and will take a month longer to write. At this point I should also emphasize that eBay is home yeast rancher’s best friend. The amounts of cell culturing equipment available there as well as the prices are just unbelievable. You’ll see examples of this throughout this article.
Basic “Blind” Yeast Ranching:
Things that would allow you to easily do basic yeast ranching such as making starters, saving yeast, washing yeast, etc. It’s “blind” because you cannot visualize the yeast cells or know what is growing in your culture.
Common Sense: The rarest of things. This is an absolute must. With it you’ll be able to utilize and adapt common household things for your yeast ranching needs, and without it you can have state of the art lab at your disposal and still manage to screw it up. Common sense includes things like making sure your equipment is clean, assuming that nothing is ever microbe-free unless you yourself made it so or it’s some certified sterile equipment like pipettes and test tubes, not breathing into your yeast flask or not using your mouth to start the syphon. Remember, there are microbes everywhere!
Sanitation and Aseptic Technique: This is not trivial and requires diligence and practice. Another absolute must. Read up on it, watch videos, remember your old microbiology course if you ever took one, ask people. It can be extremely frustrating when you suddenly have mold growing in your yeast or your started going sour (not the good kind) and so you must be very careful and paranoid about sanitation and aseptic technique while working with yeast.
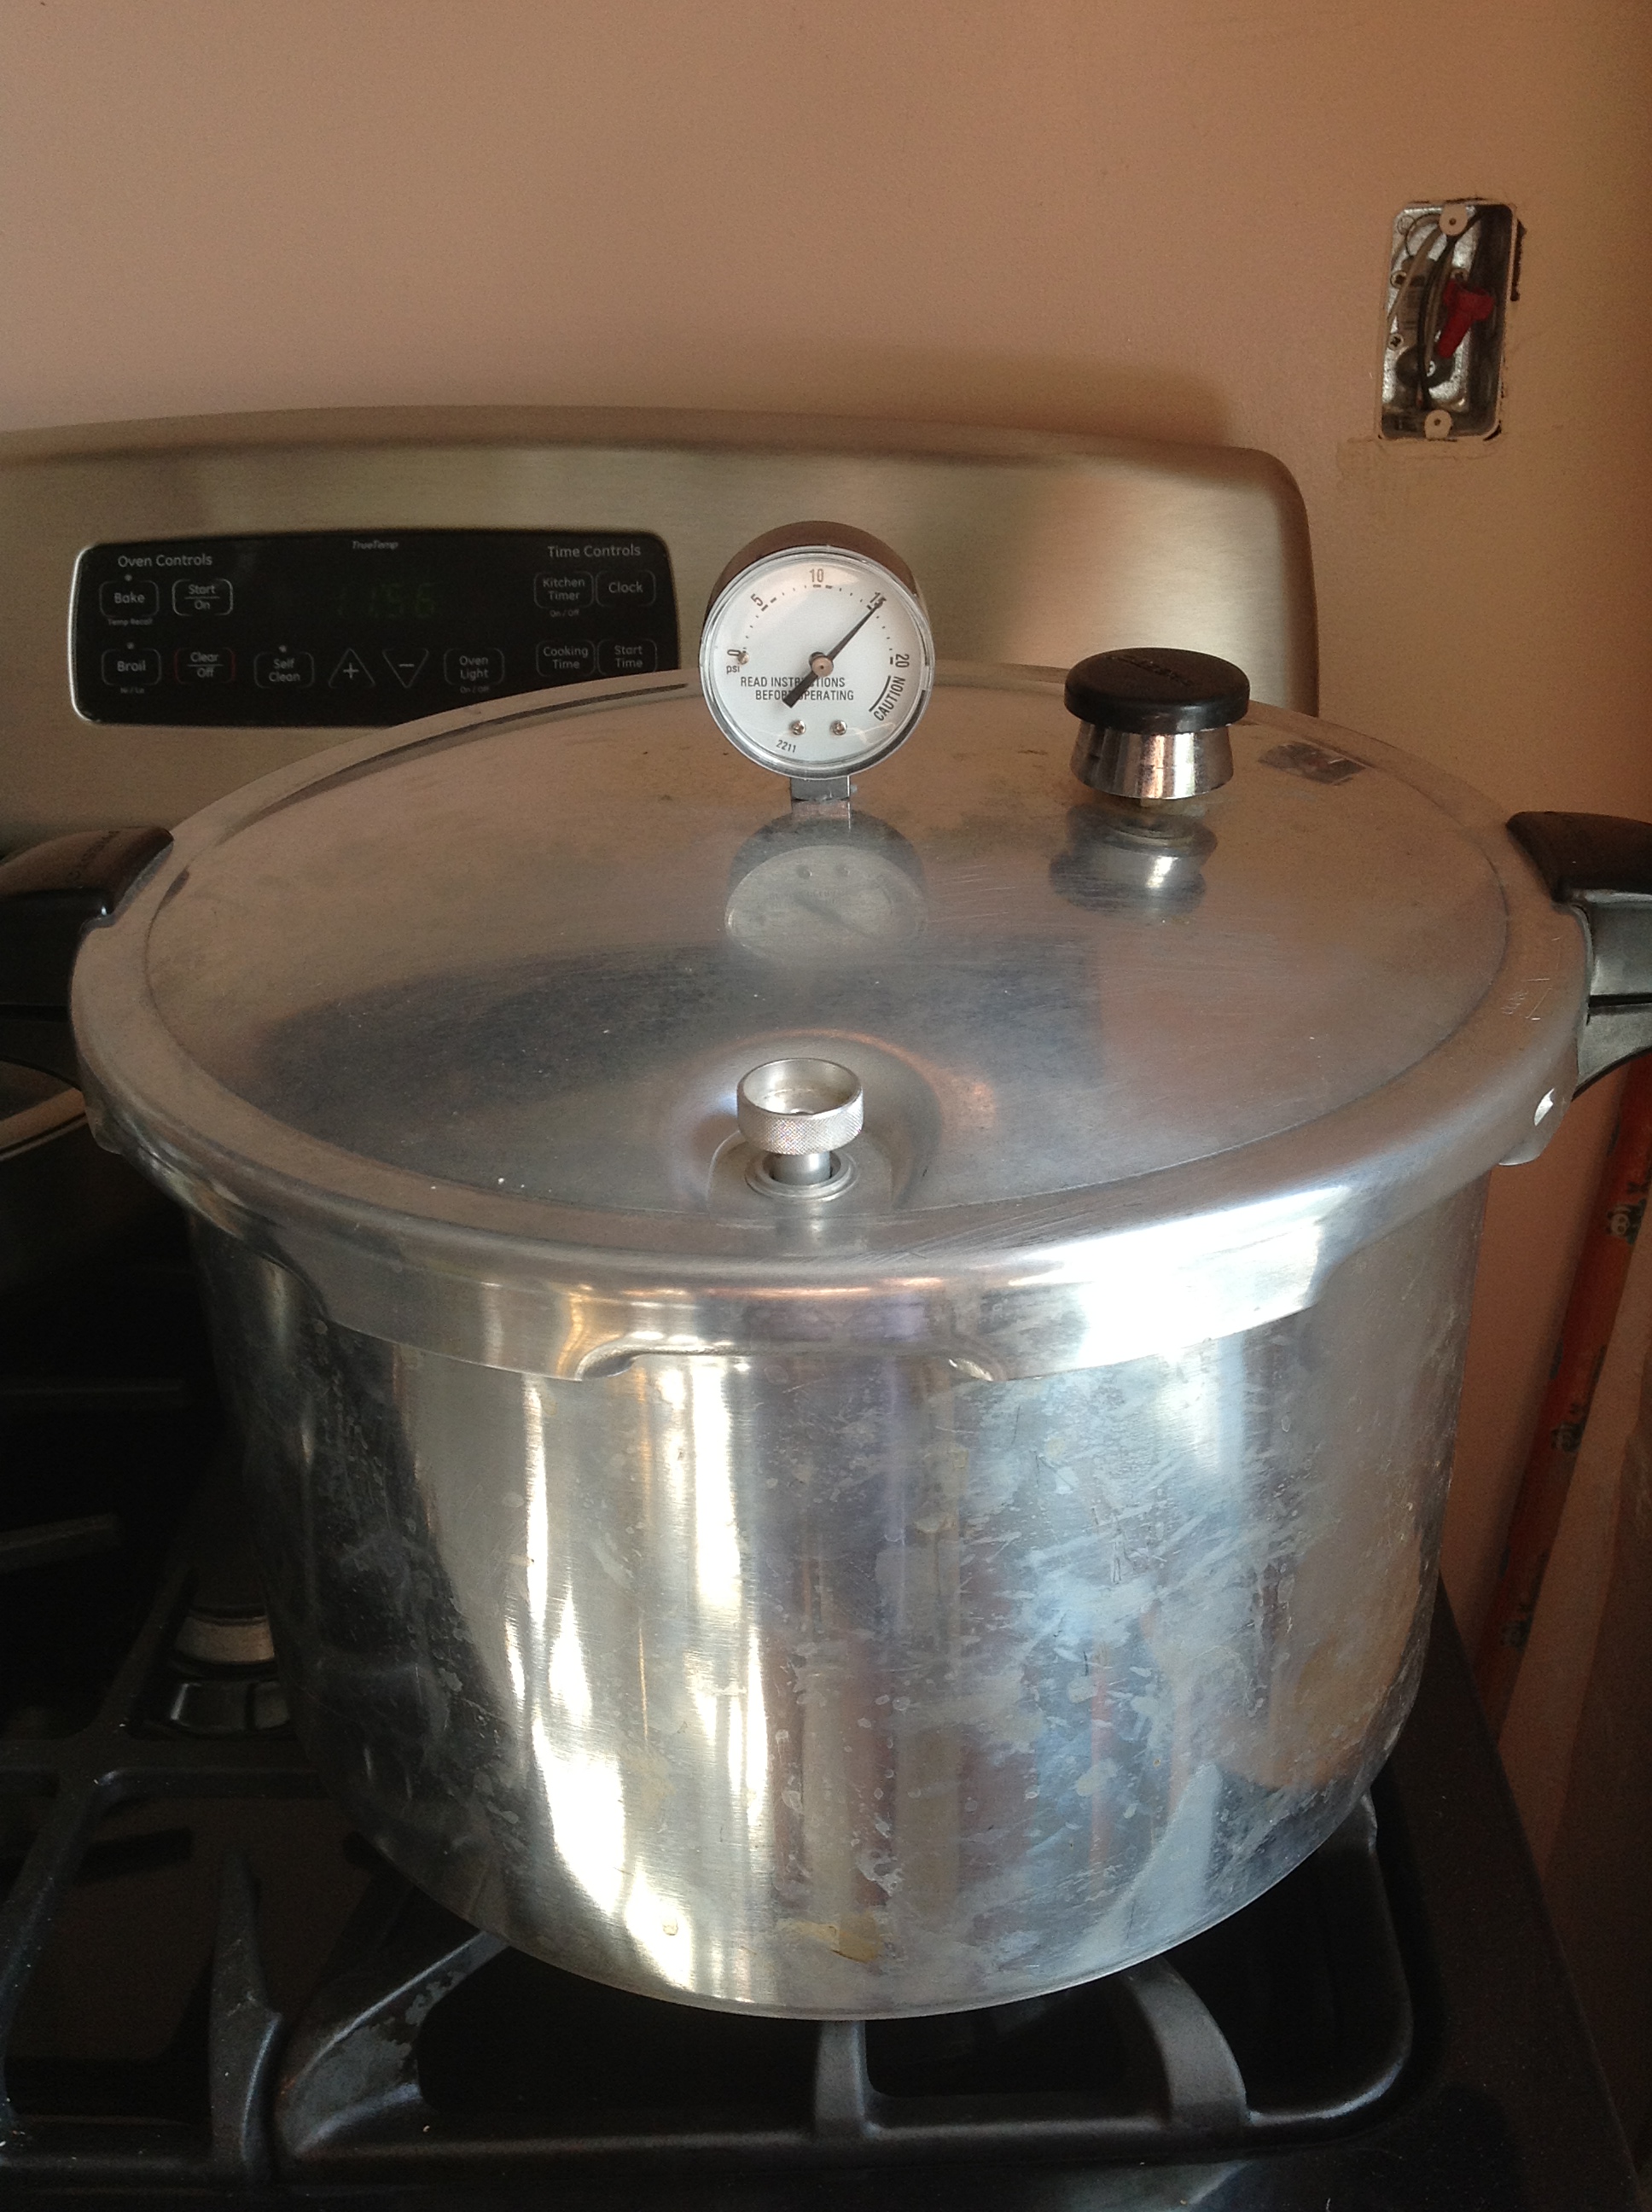
Pressure Cooker: This may be a little surprising, but I maintain that a pressure cooker is a must for yeast ranching. A lot of people just boil flasks on their stoves or soak them in Star San etc., but it’s just never as good as a pressure cooker. It’s a stovetop autoclave that sterilizes your gear! Make a starter, pressure cook it and store on a shelf or in the fridge for weeks. When you need to make a starter, just take it and you’re good to go. Can’t really think of anything that would beat it short of installing a real autoclave in your house. Mine had to be bought new for around $80 since we didn’t have one. If you have one already or your grandma hasn’t used her old one in many years and it holds the pressure, there is no reason not to use it.
Balance: To measure your DME when making starters. These also come in handy when you’re making other kinds of media including agar plates. Every brewer has these for hop measurements etc. anyway.
Glass Containers: Mason jars or other kinds of jars to make a starter in. There is absolutely no rule about having to make a starter in a flask, especially if you’re not making a stirred starter. Just make sure it’s not something made of thin glass as it may crack or break under pressure. After that just put some yeast slurry or a smack pack or however you make your starters and it’s good to go.
Pressure Sterilization vs. Tyndallization: Sure there is a way to sterilize your starter other than pressure-cooking it, but I still advocate it over any other method. First let’s familiarize ourselves with the process of tyndallization. It is a low-tech way to sterilize media and is basically heating or boiling the medium for 15-30 minutes, letting it cool and incubate overnight and repeat the boil for three consecutive days. This method relies on germination of heat-shocked spores to vegetative cells that can then be killed by boiling. Repetition of boiling and incubation is to make sure all spores germinate. This method is only effective for media that supports growth of spore-forming organisms and so is not particularly useful for sterilizing water for yeast washing for example. Pressure sterilization is a lot more effective in killing cells and spores and works well not only for medium, but water as well. As a precaution, it is wise to let your starter/medium incubate overnight and pressure cook it again the next day to kill the last of the spores that may have survived. It’s rare, but it happens that one round of pressure sterilization is not enough and I’ve seen mold growing in starters that have been sterilized only once after a couple of weeks on a shelf.
Intermediate “Blind” Yeast Ranching:
Advanced enough to make stirred starters and save yeast to use for later.
Flasks: Flasks are made of heat resistant borosilicate glass that allows them to survive the thermal and pressure changes. They also have flat bottoms so that the stir bar can easily spin. There are many different kinds of flasks. Most people to prefer Erlenmeyer. They are very nice, have a wide flat bottom and are easy to handle. Besides those I also use flat-bottomed Florence flasks. I like those because their shape makes it easy to pour the yeast out while leaving the stir bar behind so that you don’t have to worry about dumping it into the wort. My go-to place for those is HomeScienceTools.com where they sell 1L flasks for around $10 and 2L ones for $14 plus have an excellent customer service. They also have a lot of smaller flasks that are handy for growing up your culture from a small amount of yeast and working your way up to a full volume starter.
Culture Bottles: Same thing as flasks, but with screw-on caps. Handy for growing yeast as well as yeast washing and storage. Also very handy for making agar when you get advanced enough to pour your own plates. Best place for those is eBay. Normally culture bottles are ridiculously expensive, just insanely expensive, just criminally expensive! However on eBay you can find them for something like $5-8 per 500mL bottle, which is a great bargain. Smaller ones, like 125mL, are very useful for storing washed yeast in pitchable portions that you can just take out of the fridge and pitch. They can also be used to grow your yeast enough to pitch into a starter. Those run at about $3 or less per 125mL bottle on eBay so that’s nice. I got my small ones in a fortunate occurrence when a neighboring lab was throwing out a whole box of them.

Flasks, culture bottles, and other stuff
Heavy Foil: Needed for covering the flask mouth when pressure cooking, storing and growing. It prevents microbes from getting into your wort while still allowing a complete gas exchange. Cost is negligible and you can find it in almost any store.
Stir Plates + Magnetic Stirrers: We all know how beneficial it is to have an agitated starter. Agitation allows for a very good gas exchange that keeps your yeast happier and lets them grow to higher numbers. The most common way to achieve that in homebrewer setting is through a stir plate and a magnetic stirrer. The principle is pretty straightforward – a magnet is attached to a rotor under the plate and there is a magnetic stir bar in your flask. When you turn on the plate, the rotor starts rotating and the magnetic field rotates with it, rotating the stirrer in your flask. Thus there is an agitation of your culture. There are a countless number of articles with pictures and videos about how you can make one out of a computer fan and a hard-drive magnet so check them out if you’re interested. What I did was just regularly check my best friend eBay and eventually came across some amazing deals. There are currently only two plates in my possession, but it’s perfectly sufficient for my needs. One plate was bought for $10 and other than having adjustable speed it also has a temperature control. Most of you know about stir plates with heating, but this one is a stir plate with cooling, which comes in handy if you want to maintain a certain temperature. The other one cost me $14 and included a set of 5 stir bars (which are around $3-5 each if you buy separately). Compared to ~$50-70 and up that homebrew stores and other science stores charge for these, I’d say those were pretty sweet deals and even doing it yourself can’t beat the price. That being said, stirred starters are a great thing that reduces the volume of starter you need to prepare and ferment out much faster than stationary ones and every yeast rancher should invest in at least one of these. Another good method is a shaker plate or a shaker incubator that work by swirling your whole flask rather than just the liquid inside it, but that’s out of reach for most people.
A little note: put your stir bar into the starter before you pressure-cook it. That way it also gets sterilized and you don’t have to worry about putting it in later. Don’t worry about it loosing its magnetic properties. They are made for such applications and will last a very long time.

Plain stirrer

Stirrer with cooling
Intermediate “Visual” Yeast Ranching:
Now that you’re advanced enough you can start looking at your yeast and other organisms.
Microscope: A must have for any hardcore rancher. A microscope allows you to actually see your yeast and bacteria. Sometimes you can tell the difference between yeast just by looking at the cells. For example in general Saccharomyces and Brettanomyces look very different, and bacteria are unmistakably different. This is very useful for seeing if you have a mixed culture or contamination. Of course sometimes you won’t see the invading cells because there are so many more of your native cells there especially if the “infection” is very low. Nonetheless, a microscope is an immensely powerful tool. Other than just looking at your little workers, it gives you the ability to count cells as has been described in the previous post. To see yeast you’ll need a microscope with 40X objective and a 10-15-20X eyepiece for 400-600-800X-magnification power. For looking at bacterial cells you’ll need at least 1000X magnification, which would require a 100X immersion oil objective with the aforementioned eyepieces. There are a number of different ones available online for a good price. Celestron offers good microscopes at affordable prices and they’re even cheaper on Amazon or eBay to the point of being able to get a usable one for under $100. What I like about those scopes is their sturdy build and good optics and I initially used one. Later on I upgraded to AmScope – 40X-2000X Vet Clinical Stereo Compound Microscope Model B400AB that I found on sale for just below $200 and couldn’t pass it by. 2 eyepieces make it much easier to work with. It has a nice construction, dimmable light, and is pretty nice overall. However the light source is rather poor – dim and yellow and optics at 100X objective aren’t as good as Celestron. It’s still very nice and usable and those flaws don’t impede my yeast ranching process in the least and I prefer this one to my original Celestron. AmScope has a lot of microscopes of different grades and prices so check them out. I’ve been meaning to buy a better light bulb for it and have a spare 100X objective that I bought on sale for around $60 to try out and see if it’s better, but can’t get to it yet. Whatever scope you choose to get, make sure the magnification is high enough and it has an electrical light source. It’s worth to spend a few bucks on that rather than trying to play with a mirror for your light.

Microscope with camera connected to my computer
Slides + Cover Glasses: To look at your yeast you need to make slides. The easiest way to do it is to put a drop of your culture onto a slide and drop a cover glass on it. HomeScienceTools has them at decent prices. I prefer the plastic cover glasses to the glass ones because of their durability. There is nothing more annoying and horrifying than dropping a piece of 0.1mm thick glass in your room and worrying whether or not you’re going to step on that sliver of glass.
Transfer Pipettes + Pipetters: How would you put that drop without contaminating your culture? Our best friend eBay offers a solution to that. You can buy a ton of sterile transfer pipettes of different volumes for very cheap. I bought 500 1mL ones for $20-30 and 500 of 3mL ones for around the same price. Basically they’re almost free and let you take samples and transfer samples without having to worry about sterilizing your pipette. Another option for transferring your samples between flasks or tubes would be serological pipettes. People on eBay sell them for down to 20% of what they normally cost. You need a pipetter for those though, which you can also find there. There are manual and bulb-action as well as motorized ones.

Sterile transfer pipettes

Serological pipettes
Test Tubes: Another must have for cell culture work, and again eBay saves us with best prices and that’s where I get them. Sterile 15 or 50mL tubes in racks for quite cheap. Perfect for starting cultures from colonies (not advanced enough yet!) or dregs as well as keeping yeast in them. Those of you who received the Cantillon Brett cultures know what I’m talking about. Glass ones are also very nice, but I prefer plastic. They come sterile and you just use them without worrying about sterilizing them first. If you really want to reuse them you can just wash and pressure-cook them and you’ll be fine. Even though the manufacturers usually say those tubes are not autoclavable, you can go ahead and cook them. I’ve grown insect cells without antibiotics that way for 15 months without a single instance of infection, which earned me the nickname of “cell whisperer” in the lab.


Hemocytometer: AKA counting chamber. Used for calculating culture density as described in the previous article. These things are so ridiculously expensive that even culture flasks look cheap in comparison. Luckily eBay sells cheap ones from China that take a few weeks to get to you, but for $20-30 it’s worth the wait.
Spray Bottle and Alcohol: You need that to sanitize your hands, flask mouth and whatever else you want. Bottles can be found in just about any store and alcohol is also not that hard to find.
Advanced Yeast Ranching:
Now that you’re an accomplished yeast rancher, you can start picking out individual yeast strains.
Knowledge: You’d think that it’s a basic thing to have, but I don’t find it all that necessary until you reach a certain level. There really isn’t all that much thinking involved when you’re just growing from slurries, making starters, or even just looking at what you have in there under microscope. Best thing about knowledge is that it’s free. The Internet is full of free books and articles about yeast and microbiology in general. You could also audit a microbiology course at your local college. All you need to do is talk to the professor teaching it and I’ve never heard of one refusing to let anyone audit their class and some even take you in for the ride in the lab sections of the class where you can learn just about every technique you need to know for yeast ranching. Another option would be iTunes U – one of the most amazing things ever done by Apple. I’m sure most of you are familiar with the iTunes store where you buy music, but iTunes U is a part of the music store that is completely free and 100% aimed at education. It’s where professors upload their lectures in audio and sometimes even in video and anyone is free to download and reap the benefits. It’s like going to class without leaving your home. Just great stuff! You can find a lot of general biology, cell biology, microbiology, virology and just whatever classes you want there. I cited one in the previous post. It’s truly an amazing thing. You could also read books, of which there are several on microbiology in general as well as yeast specifically. Anyone can reach a relatively high level from the free recourses I just told you about in 6-12 months of casual learning. Knowledge and ability to think will take you to the next level.
Plates: aka Petri Dishes – bread and butter of yeast isolation. You need plates to pour agars into and grow your yeast or bacterial colonies. You have a choice between reusable glass ones and disposable plastic. I choose to go with plastic because I don’t have to sterilize them. You can find both kinds on eBay, and I usually go with a case of 500 for ~$60. Slants that enjoy certain popularity with yeast ranchers are the same thing as plates, but much smaller and with a screw cap that prevents them from drying, making them the preferred method for culture storage among homebrewers. Plates may be sealed with Parafilm (cheap on eBay, just make sure you know how to use it and get the lab stuff, not the tree wrapping one) that also prevents drying and keeps them for a very long time in a refrigerator.

Agar and Media: See my agar recipes. Agar is the medium you grow your cultures on as well as the solidifying agent used to make agars semi-solid. When you buy agar powder, make sure it’s purified and has low amount of ash in it. Generally people who sell it sell good stuff, but sometimes it’s very dirty and you can’t use it for making plates. Again you can get 100g for around $10-20 on eBay and that’s easily enough for over 100 plates. Other than the solidifying agent, your agar medium should contain sources of carbon and nitrogen at the very least plus selective agents and indicators. Handbook of Microbiological Media by Ronald M. Atlas is a great book with hundreds of media recipes and what they’re used for and how they should be prepared. I’d recommend getting it if you can find it for cheap. Internet is also a great resource for media recipes and if all fails, knowledge and common sense will guide you. For example you have a mixed culture of Saccharomyces and Brettanomyces and you want to isolate the Brett. You know that Brettanomyces bruxellensis is able to ferment lactose while the other one can’t. So you can quickly make an agar with lactose as a sole source of carbon and plate your mixture. Saccharomyces will starve and not grow as well as Brettanomyces, or not at all. Or you can use brilliant green in your agar to kill off bacteria in your culture and be able to pick out yeast colonies. Things like that can make your life much easier.

Poured plates cooling in the hood

Same plates, but under UV light
Alcohol Lamp: Used in plating your cultures onto the agar plates and run on high% alcohol, such as denatured alcohol that you can get at paint stores. Burning one creates a “hot air hood” that prevents bacteria and mold from falling into your agar as you’re plating because the resulting flux of hot air pulls the particles in the air upwards. It’s quite effective and is often used in laboratories, though mostly they use Bunsen burners, but it’s the same thing for our purposes. Takes some practice, but you’ll get there. The flame is also used to flame sterilize inoculating loop or cell spreader. HomeScienceTools sells them for a reasonable price.

Alcohol lamp with its fuel plus a little butane burner and an inoculating loop
Inoculating Loop: Used for streaking your cultures on agar. It’s basically a piece of wire with a loop on the end and a handle. The loop acts the same way as a soap bubble loop and is used to take a small liquid sample and streak across your medium to separate single cells that later grow into colonies. The loop is first heated over flame until red hot to sterilize. You can make your own, but I bought mine from HomeScienceTools.
Cell Spreader: Similar to inoculating loop, but rather than streaking a sample you use it to spread a drop of it evenly through the whole plate. There are a number of them available from single use disposable ones to nice glass ones. In either case none compare in price to just buying a glass rod and bending it with help of a propane or butane burner. HomeScienceTools sells glass rods that I use to make my spreader.

Glass rod and a cell spreader made from one just like it
Stains: Stains are more geared towards bacteria rather than yeast, but you can use several to stain the nuclei and cytoplasm if you wish to see. Gram stain is quite useful for figuring out what bacteria you have in your culture. For example it would allow you to easily distinguish between Lactobacillus and Acetobacter that may be plaguing your beer. HomeScienceTools has a wide selection at reasonable prices as well as educational videos about staining procedures.

Luxury Yeast Ranching:
These things are luxury. Completely unnecessary, but cool to play with and make your process faster and more effective
Scientific Friends: Having friends in science, such as students, professors, postdocs and technicians who enjoy your homebrew goes a very long way.
Incubator: You don’t really need a special temperature to grow your yeast and they’re perfectly happy at room temperature. In labs though, they’re usually incubated at ~30°C (86°F). In my recent attempt to isolate some aggressive strain of Lactobacillus (presumably L. brevis that can withstand hops and sour even hoppy beers) from Cascade Brewery dregs (thanks for all the samples guys!) I decided it was time to take the plunge and get me one because these bacteria prefer temperatures closer to that of our body and grow much better at 30-35°C (86-95°F). The incubator you see in the photo is a ~$400 piece of equipment what I got on eBay for $72. I just love when people sell things without knowing what they are and this person thought it was something else due to some notes that were taped to it so his description of the item was messed up, which reflected on the final price. I was watching several of these at the same time and others that were more beat up and older sold like hot cakes for $200-300-400 because people who sold them knew what they had. That’s a pretty good deal in my opinion. It’s almost new, no scratches, perfect interior, digital dial, great temperature control, basically I’m very happy with it. While Lactobacilli seem to like growing there and I may have already isolated that special sour strain, I wanted to see how the yeasts like it. I have to tell you, it’s amazing. Growth is probably 2-3 times as fast as in room temperature. Colonies appear on plates the next day after plating rather than 2-3 days and grow much faster. Liquid cultures also grow very well. Now I grow all my initial yeast samples and isolates in the incubator and it works great. I’m very happy so far.


Hood: An enclosed, separate space where you work with cultures with a transparent “window” through which you see what you’re doing is a very nice thing to have, though not really necessary. It keeps the amount of particles falling into your work lower than if it was your kitchen table. Mine is pretty small and not as comfortable as I’d like it. It originally was a bookshelf that I modified into using as a hood. There is no laminal flow because I’m a grad student, not an oil magnate and can’t afford going that far. When we were moving I originally planned to adopt another shelf as my hood, which would have been deeper and wider, but in the end I decided to stay with the old one and just adapt to working in it plus adding a UV lamp and rewiring the daylight fixture inside so that it’s more compact and with a switch on the outside. It’s also positioned differently now so it’s more comfortable than before though I really wish it was deeper. If you plan to make one for yourself, I’d recommend making it about 2 feet deep, about 3-4 feet wide and 2-2.5 feet high. At least that would be perfectly sufficient for me.

Improved hood + UV lamp
UV Lamp: Unnecessary, but probably the best addition to my lab. Jason at Science Brewer recommended me getting one, but I didn’t at the time because I had to share my room and I was afraid the Plexiglas would crack. The lamp itself cost ~$80 on eBay. Installation was pretty straightforward – just drill a hole in the hood wall and poke it through. I turn it on about 10 minutes before working in it. When I pour plates I let them cool and solidify under the UV for an hour or two and the results are just stellar. I poured a lot of plates since installing it and not one had mold growing on it after incubation for a week. It’s amazing! My fear about Plexiglas cracking was correct though. You can’t really see it in pictures, but the area closest to the lamp has a spider web of cracks radiating from it. Eventually it’ll have to be changed, but it’s not a big deal. Also if you work in it with UV on, wear gloves and long sleeves or you’ll start to feel the burn after a while. I do that sometimes when I really want something to be as contaminant free as possible, and even though I hate wearing gloves when doing cell culture and almost never do because they get in the way, I wear them to protect myself from the UV. Another nifty feature was adapting a broken stainless steel dish rack as a movable tray inside the hood. As you can see in the photo, I can move it up close to the lamp and leave my plates there or tubes with medium, or flasks with water etc. to sterilize them just that little bit more. Works great so far.
Microscope Camera: Another luxury item. Lets you easily project your micro images onto your computer and analyze them quickly. You can get a cheap one for ~$50 on Amazon or from Celestron, but I’d advise against it. 2MP just doesn’t cut it. You’ll end up with the fuzzy pathetic pictures like what I have all over my blog that really don’t do justice to what’s really there. A decent camera would cost a couple hundred dollars and that’s out of my league, at least for now. Putting your regular camera or phone to the eyepiece and snapping a picture will give you a better quality image, but makes analysis such as measurements a lot more difficult because you can’t calibrate it very well. I also like being able to just snap the picture right into the computer and not have to transfer files back and forth.
Micropipettes: Allows you to measure out and transfer tiny volumes that you can’t do with transfer or serological pipettes. Perfect for when you need to use tiny amounts of reagents for your agar mixes such as antibiotics, cupper sulfate, p-coumaric acid etc. A workaround could be just making highly dilute solutions and using larger volumes, but there are errors associated with these methods. They are also very handy when you need to make serial dilutions of your culture for counting. I’ve been toying with the idea of getting some, but it’s just an idea so far. They cost a couple hundred dollars each, but you can get used ones on eBay for as low as $20. They are probably not calibrated, but you’re not planning to do research at your yeast ranch anyway.
Pipet-Aid Motorized Pipetter: Got on eBay for $24. Essentially a pump with a pipette nozzle. Very nifty for pipetting with the serological pipettes mentioned above. Plugs into the outlet and you control uptake and release with two buttons on the handle. You can use the manual or bulb pipetters instead, but your thumb will hate you for rolling the wheel up and down or having to squeeze the bulb every 100mL.
Darkfield Condenser: Very cool toy! Too bad it costs almost as much as the microscope itself. Basically it’s a light condenser for your microscope that changes the way light passes through your sample and makes things stand out as white on black background. It allows you to see detail much better in unstained samples. Worth checking out if you like looking at your cells in detail. I got mine from AmScope – Oil Darkfield Condenser For Compound Microscopes Model DK-OIL100. It’s a high power oil condenser and works very well with 100X objective. Just way cool! No real relevance to yeast ranching aside from being able to see more detail such as nuclei at high power.
Culture Fridge: You need to keep your cultures somewhere, right? People who lived here previously left their old fridge behind and I took it for my ranching needs. You can store your plates, cultures, yeast packs, bottles, hops, brewing herbs and spices and even grain in it.


So this is how I setup my lab and what equipment I amassed over time. Procedures weren’t covered in this post because I didn’t want it too long and most people know them anyway. Recently a request came in to post the procedure for isolating yeast from bottles so I’ll try to do a step-by-step with photos in upcoming weeks. Please feel free to ask for “how-to” posts if you want me to clarify something or walk you through something. If you have some suggestions or comments, please feel free to make yourself heard and I’ll gladly discuss things with you.
To list the sites that helped me in setting up the lab and may be useful to you:
All of them are great sources of all sorts of equipment and worth checking out.
Cheers!

Nice article,
Do you have some false bottom inside the pressure cooker or you put the flasks/bottles directly into water?
There is a false bottom, but it’s not that high. Flasks and bottles still sit in water, just not directly on the cooker bottom.
Thank you for this detailed write-up, as well as the links/sources you provided for purchasing equipment. It will help me progressively move deeper into yeast ranching.
I’ve been watching Craigslist for some pressure cookers for the past couple of weeks. I’m still not quite sure what size pressure cooker I need to fit my 2000ml Pyrex Erlenmeyer flask, but it would seem that I would need one larger than most that I have seen for sale. What size/brand do you use?
Hey Luke!
I’m using Presto 23 quart (http://www.amazon.com/Presto-01781-23-Quart-Pressure-Canner/dp/B0000BYCFU/ref=sr_1_4?ie=UTF8&qid=1355799222&sr=8-4&keywords=pressure+cooker) and it is too small for 2L flasks or gallon jugs. So I end up having to sterilize them lying on the side and then put water or wort that I sterilized in 1L flasks or bottles in them in the hood under UV. I didn’t have the money to get a bigger one back then so I’m stuck with this. I’d go for something tall enough to fit a 2L flask into.
Dimitri,
Very impressive setup you have there! I’m especially impressed with the 30C incubator you snagged.
After recently moving from Colombia and working at Merck, I’ve lost access to lab equipment that I previously used to isolate a few strains. I might have to go your route, but its a long way off.
Cheers,
Jason
Yeah I think it was almost like stealing it hehehe. And yes, setting this up is not an easy task and takes a lot of space and time.
Jason and Dimitri, I realize this is an old post, but what are yall’s thoughts on making an Incubator? We had Teri Fahrendorf come speak at our club meeting last night about malts and there was reference to the incubator she built and I am planning on building it myself to culture strains (including Cascade’s Lacto). Basically you get a picnic cooler, turn it on its side, put a light bulb inside and run a temp probe to the inside as well, run the light bulb on a temp controller. Put your media into the cooler, shut the door, turn it on, and set it to 86*F. You cover the bulb with foil to keep it from shining directly onto the media.
Thoughts?
Sounds to me like it would work just fine. You can do the same with a heat pad. You can also build a box out of plywood and styrofoam with a door in the side to make it easier to get things in and out of it. As long as it maintains the temperature, you should be fine.
Great write up. Thank you for taking the time to share both your time and knowledge. Not to mention the cultures!
My pleasure!
SLX is a mix of MEK, methanol, and ethanol. It’s a bit nasty, not particularly safe, and unhealthy for the user. It’s meant as paint thinner. You can find relatively safe and clean ethanol at Home Depot or Lowes under the Kleen Strip Green line of denatured alcohol. It’s >95% ethanol with a touch of methanol to denature it. If you just want methanol without the MEK, you can find pure methanol in the form of HEET gas line antifreeze at most stores. It is the yellow bottle. The red bottle HEET is shit. It is isopropanol, which burns with a sooty flame.
The purest, bluest, most complete combustion comes from pure methanol in the HEET bottles. That’s what I use for priming my camping stoves.
Yes! Very good point! This stuff is indeed unpleasant, but I use it because it’s considerably cheaper and I only burn the lamp for only a few minutes (under a minute if it’s just 1-2 plates) at a time because I work fast. But thanks for the tip! Finally some constructive criticism!
Good work here. I’m hoping to have my lab together eventually and this helps to organize my thoughts. The technique is the part I really need help on, so the link to the iTunes U was great. It looks like I know how I’ll be spending my time for a while.
Good work indeed! Have some plans to build a small “yeast lab” when I move and will def come back to this page for inspiration. I’m also in research, so I know (down to the dollar, recently ordered a new one for our lab) how extremely expensive TC hoods are, but check this page out: http://blog.makezine.com/projects/home-mycology-lab/
I’m interested in you UV light setup. Can you provide any details? Bulb? Fixture? Setup?
Thanks. I love your site.
I got my lamp from eBay for ~$80.
It’s a 36 watt germicidal bulb for air duct air purification.
They usually come with the hardware and you just need to get the plug onto it so you can connect it into an outlet.
I’m debating on buying a UV light but, I did some looking online and they seem kinda dangerous. What type of protective procedures do you use to be safe?
They sure are! I use the plexiglass screen as you can see in the photos. And don’t work under UV light.
How long do you pressure cook your yeast starters for? And do you ever have boil overs in the cooker?
Boil over seldom happens. General rule is to leave the flask half empty, but I tried 800 ml in 1L flasks and never had the problem.
I cook for 15-30 minutes, let cool for a day and then cook again.
Hey! I really like your text about you yeast ranch:) I was just wondering if you know, whats the difference between a bacteria incubator and a egg incubator. Sure I understand that its a temp difference but as you were saying yeast colonies are happy at just 30 degrees celsius, and a cheap egg incubator could easily keep that temp.
Are there any other differences?
Thank you and best wishes Mikael
Perhaps the humidity if you’re growing cultures on plates, but otherwise I think they’re pretty much the same for homebrewing purposes.
True, the humidity could help out even more. Referring to equator like environment. Well the only way to know is to get one:P thanks for your reply:)
I know it’s a very old post but I’m struggling to find an answer to this and you seem like a person who would know.
Why not use UV light instead pressure cooker to sterilise everything?
I just started reading your blog…very impressed, amazing work.